Translation preview in the Godot editor
Sat May 11 2024
What are we doing?
Godot has a great translation mechanism. And it supports two ways to define them - CSV and gettext.
While for gettext, you usually use the original English text or your native language, with CSV, you usually work with predefined keys.
Using predefined keys is great in the sense that it gives you more control over your translations. You can not only be verbose for words with multiple meanings like BANK_BUILDING and BANK_VERB, but you can also create dynamic keys in runtime to look up translations for a database of things.
Now, the downside of using predefined keys in Godot is that you can't see what they resolve to, so it's hard to judge the layout requirements, especially if your translation key resolves to entire paragraphs of text.
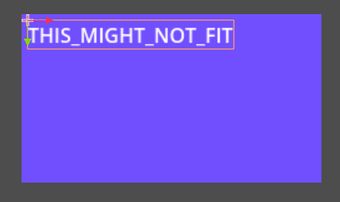
You can't see the actual text in the editor; you have to launch the game to see it, and this might be a bit tedious, especially in the early phases of designing content when there are lots of changes. Of course, you can also change things around in the editor while the game is running; Godot is great with that, although that has its limits and can be inconvenient if you work with a single screen. Another way to avoid this is to work with the original text in the beginning and then change it to the translation key when you deem that part of the content complete, but if you want to do the groundwork for translation early on, then it's better to define the key and put it in your translation source CSV right at the start.
We'll try and aim for the best of both worlds—you can put your translation keys in Labels right away and still see the actual text in the editor.
Here's the result of what we are going to build today:

Disclaimer: This approach hasn't been "battle tested," as in, this is just conceptual on how one might approach this, and this might become irrelevant at some point in time if/when translation preview becomes a part of the engine.
The setup
Start a new project as usual, or open an existing one, and right away we'll create an addon that will provide the editor with the translations. Go to Project Settings → Plugins → Create New Plugin. Enter "LiveTranslatePlugin" as the "Plugin Name" and press "Create".
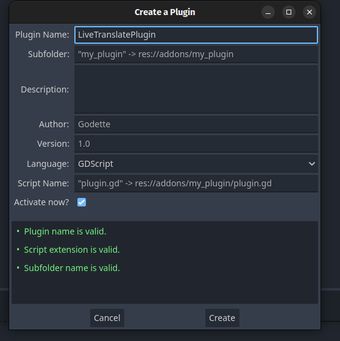
This will create the necessary folder structure and make the plugin active.
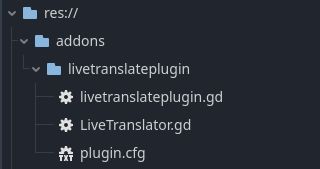
Right there in the addons/livetranslateplugin folder, right-click and go to Create New → Script. Give it a name like LiveTranslator.gd and press "Create". After that, you should have a folder structure that looks something like this:
We also need a translation source CSV file. While we could open up a spreadsheet editor (I recommend LibreOffice Calc; it works great with Godot-friendly CSV), for this example, we'll just write our CSV by hand. Open a text editing application like Notepad (i use neovim btw) and enter the following contents:
keys,en
INTRO_GREETING,"Hello, adventurer!"
The first line is our table headers: keys and en, with "en" being the ISO 639-1 language code for the English language. INTRO_GREETING will be our key, and that will resolve to Hello, adventurer!. Eventually, when you want to translate your game, just add more columns with the appropriate language code in the header and fill out the values.
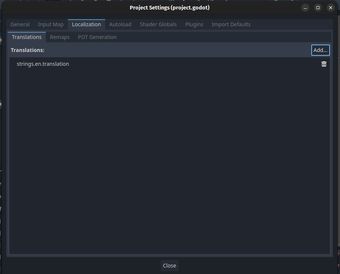
Save this file in your project folder with a name like strings.csv. Notice that when opening the Godot window, it has also generated a new file, strings.en.translation. You have to add it to the Godot translation system for your translations to work in the game itself, since our solution is meant for the editor only. Go to Project Settings → Localization → Translations to add it:
Now we are good to fill out the necessary scripts!
The code
Open up res://addons/livetranslateplugin/LiveTranslator.gd and replace its contents with the following:
@tool
extends Node

signal translations_read

var keys: Dictionary = {}


func _ready() -> void:
    if not Engine.is_editor_hint():
        queue_free()
        return
    read_translations()


func read_translations() -> void:
    keys.clear()

    var file: FileAccess = FileAccess.open("res://strings.csv", FileAccess.READ)
    while not file.eof_reached():
        var line: PackedStringArray = file.get_csv_line()

        if len(line) < 2:
            continue

        # index 0 - "keys" column
        # index 1 - "en" column
        keys[line[0]] = line[1]

    file.close()
    translations_read.emit()
This will be our autoload singleton, which will provide translations to our labels. Here are the key points to explain what it does:
- it's a
@toolscript, because we need it to run while the editor is running. - we define a signal
translations_readthat will let the labels know that they can query our singleton for up-to-date translations. keysis a dictionary where we will hold the translations. The key will be the translation key (first column of our CSV), and the value will be the English text.- in the
_ready()method, the singleton checks if it is running in the editor. If not, it deletes itself since we will use Godot's internal translation mechanism while the game is actually running. - if it's running in the editor, we call the
read_translations()method, which readsstrings.csv, stores its contents in thekeysdictionary, and emits thetranslations_readsignal at the end. As a value, it takes the 2nd column; that's where the English text is in the CSV. We could as well point it to a different language when we add more columns to the CSV. That said, for multi-language testing, I rather recommend just building a debug language switcher that allows switching languages in the scene while the game is running. All you need to do to switch the language on runtime is to callTranslationServer.set_locale()with a valid language code. Labels, buttons, and such will update immediately, but you will have to reload remapped scenes manually.
You might ask, "Why are you reading the CSV directly? Why not use the translation mechanism and call tr() in a @tool script instead?" Because calling tr() in a @tool script doesn't actually translate and just returns the original key, so we, unfortunately, have to collect the translations ourselves. Yuri Sizov jumped in to explain that the editor doesn't use the TranslationServer. The server exists, but it is not aware of the current editor language.
Next up we will set up the plugin itself. Open livetranslateplugin.gd and replace its contents with the following:
@tool
extends EditorPlugin

const SINGLETON_NAME: String = "LiveTranslator"
const TOOL_MENU_NAME: String = "Reread translations"
var translation_read_callable: Callable = func (): LiveTranslator.read_translations()


func _enter_tree():
    add_autoload_singleton(SINGLETON_NAME, "LiveTranslator.gd")
    add_tool_menu_item(TOOL_MENU_NAME, translation_read_callable)


func _exit_tree():
    remove_autoload_singleton(SINGLETON_NAME)
    remove_tool_menu_item(TOOL_MENU_NAME)
Here we define our autoload name, which will be used to access the translation values, and the tool menu item name, which will trigger the LiveTranslator singleton to reread the strings CSV. The plugin itself is also annotated with @tool since all editor plugins have to run in the editor. Then it just sets up adding and removing the LiveTranslator singleton and the tool menu item, which on click will reread the CSV in case you change the CSV file, e.g., edit a string.
Now if you reload your project, it should load the singleton as well as add "Reread translations" to the Tools menu, as you can see below. At this point, translations should be loaded and ready to be queried by all @tool nodes.
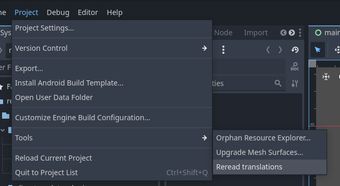
Finally, we will make a label which will query LiveTranslator for a translation when we input a valid translation key and display the resulting translation.
Create a new "User Interface" scene.
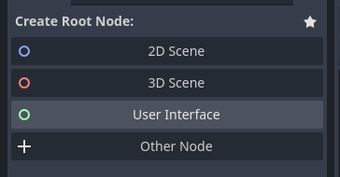
Select the Control node it just created and change its type to a Label.
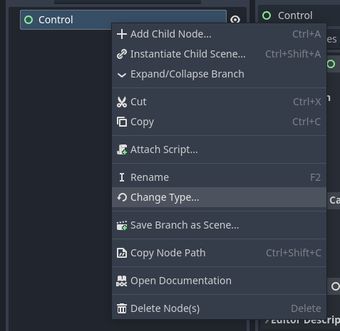
Attach a script to it and set its contents to the following:
@tool
class_name LiveTranslateLabel
extends Label


@export_multiline var translation_key: String:
    set = set_translation_key


func _ready() -> void:
    LiveTranslator.translations_read.connect(func () -> void: set_translation_key(translation_key))


func set_translation_key(v: String) -> void:
    translation_key = v

    if Engine.is_editor_hint():
        text = LiveTranslator.keys.get(v, "")
    else:
        text = v
Essentially, what it does is:
- it's a
@toolscript, so we ensure that it runs in the editor. - it exposes a string property where we can input a translation key. It uses a setter so we can add side effects to the assignment, which are: we update the
translation_keyproperty itself; if the script runs in the editor, it queriesLiveTranslatorfor a translation matching the key; otherwise, if it runs in the game, it sets the key itself as the text, so it's run through Godot's internal translation mechanism. - on
_ready(), it connects to our singleton'stranslations_readevent, so it knows when to refetch the translation.
So, if you did everything correctly, you can add this label as an instantiated child scene, enter INTRO_GREETING in the "Translation Key" field, and it should turn into "Hello, Adventurer!" in the editor, and you should see the same result when you launch the game.
You can change "Hello, adventurer!" to something else in a text or spreadsheet editor in strings.csv, and then just go to Project → Tools → Reread translations and the label should update with the new text:

Conclusion
This should give you a good starting point. You can extend this approach to Buttons, RichTextLabels and your own custom nodes, as well as preview different languages by changing the column which LiveTranslator reads for translation values. It's also easier to manage translations when they are split up into multiple files, for example, one CSV per level, scenario, or a similar contextual unit. Then you'd need to update LiveTranslator to read all of them instead of just a single file.
You can download the project files from here.
If you have questions, comments or concerns, feel free to reach out on X or mastodon!