Remote debugging Godot games on the Steam Deck
Wed Oct 30 2024
Updated 21/01/2025
Prelude
Godot is great when it comes to cross-platform stuff. I consistently create Windows exports from my Linux setup, and I've yet to encounter any sort of issue with them. I would feel safe putting them into production, not that I have yet (14/11/2024 update - I built the Windows production version of The Rise of the Golden Idol patch 1.0.2 from my Linux setup). I did have a couple issues on Valve's Steam Deck, and as the lazy person that I am, I tried to figure out a process of fixing said issues as comfortably as possible.
A long time ago I had done some light Android application development, and I enjoyed the convenience of running the app on a real phone while developing it from a computer. Of course, writing Java from a phone wouldn't have been a pleasant experience in the first place, the Java part notwithstanding.
I was wondering if I could do something similar with the Steam Deck. I recalled glancing over the terms "remote debugging" in the Godot user interface, but had always assumed it was only for phones (and that part isn't incorrect). A quick internet search proved me wrong, as I discovered a great video by Banshee Byte. Using the video as a guide helped me set everything up and running, and having now shared this link with you, I could just as well end the article here and we would all walk away as winners.
Instead, I want to lay this process out in text form with some personal bits sprinkled in that I felt were missing from the video, so you and I have somewhere to copy/paste from in the future.
(A note before we start: of course, an alternative to all this would be to set up Godot, your game project, and everything else on the Steam Deck itself, but that process has more steps and its own downsides, especially if you have borrowed the Steam Deck from an unsuspecting friend.)
Configuring the Steam Deck
The only prerequisite is that your computer is on the same network as your Steam Deck, as the file transfer is done through the air. Also, it's safe to say that I'd advise against doing this in, like, an airport or cafe over a public WiFi network, just to be on the safe side. And the speed of public WiFi leaves much to be desired, anyway.
So, to come to a place where we can minimize fiddling with the Deck to have things running, we have to do some fiddling with the Deck. There are two options to do said fiddling. Either doing it on the Steam Deck itself or via Steam Link. Regardless of which one you pick, make sure you are in the Desktop mode (click "Switch to Desktop" in the "Power" menu of the device). If you have an active Steam Link connection at the moment when you switch to the desktop, it will be disconnected, but you can just reconnect right after.
In a nutshell, we have to do two things on the Steam Deck: set up a password and launch an SSH server. If you aren't familiar with SSH, it's basically a way to securely exchange information between two computers. Go to the "Application Launcher" (bottom left button), select "System", and then click "Konsole".
This will open a terminal window. Type "passwd" and press Enter. It will prompt you for a password. Enter, preferrably, something safer than "qwerty" or "password" twice. We will use this to authenticate ourselves to the Steam Deck from our work computer. Now we have to start the SSH server, which will allow Godot to push and launch your game. You can do so with the following command:
sudo systemctl start sshdIt will ask you for a password. Enter the one you supplied to the passwd command.
If you aren't a Linux person, here's what the above command does:
sudomeans "substitute user and do". It allows to execute a command on behalf of a different user. We can't start servers on Linux as our regular-Joe user, so it needs to be done by a user with elevated privileges.systemctlis a utility program for controlling services (basically, long-running processes) in modern Linux operating systems, among other things.start sshdtellssystemctlthat it should start the ssh daemon (which is such a cool word). It will manage incoming connections that use the SSH protocol.
By the way, after you are done with your debugging session, I recommend stopping the server with sudo systemctl stop sshd. No reason to keep it running.
Before we can hop back on the computer, we have to determine the IP address of the Steam Deck. Type the following in the terminal window.
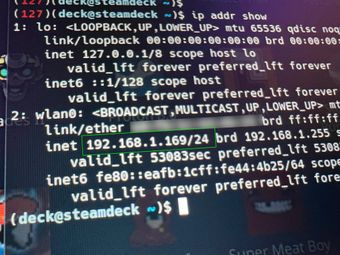
ip addr showNote the IP address in the wlan0 section. wlan0 denotes the wireless adapter of the Steam Deck. It might be called differently on your unit. Here's a green box to help you find it:

In my example, in the above photo, you can see that the IP address of this Steam Deck is 192.168.1.169. Note yours down somewhere, because we'll need it in the next steps as we move to the computer configuration part.
Configuring the computer
Where there's a server, there needs to be a client, and to connect to an SSH server, we need an SSH client. Whether you're on Linux, Windows, or MacOS, chances are, you already have one installed, so open up a terminal/command prompt/PowerShell window, whatever is applicable to your current environment, and type ssh -V. If it returns a version string, you are set up and good to go. If not, then the installation is fairly simple:
- on MacOS, assuming you have homebrew installed, it's going to be something like
brew install openssh. - on Linux, use your distribution's package manager, e.g.,
sudo apt install openssh-client. - on Windows, you have to go to "Settings > Apps > Optional features" and then look for "OpenSSH Client".
Now that you have set that up, it's time to try and connect to the Steam Deck via SSH. Again, have the terminal ready on your computer and type the following:
ssh deck@192.168.1.169Just make sure to use the correct IP address, which probably isn't the one I'm using above, and in case you're wondering, deck is the default user name for your active Steam Deck user. On connection, it will prompt you for a password. Enter the password you set up earlier. If everything is correct, you'll be greeted with a prompt:
(1)(deck@steamdeck ~)$Type logout and press Enter.
That means that we have successfully established a connection to the Steam Deck, and that's great, but there's one more thing we have to do outside of Godot. We have to set it up so that our computer can connect and authenticate to the Deck without us having to enter a password every time. For that, we'll use SSH key-based authentication. It's basically like me and you coming up with a color mixture that only we know how to make, and that's how we can recognize each other in a secure way.
For generating keys, the OpenSSH client ships with a tool called ssh-keygen. Run it with the following command:
ssh-keygenFirst, it will ask you for a path where to save the key file. Unless you plan to have multiple of these, leave it as the default path by pressing Enter. Next, it will ask you for a passphrase. Leave that empty as well, by pressing Enter twice—once to set and the second time to confirm.
The total output will look something like this:
Generating public/private rsa key pair.
Enter file in which to save the key (/home/youruser/.ssh/id_rsa):
Enter passphrase (empty for no passphrase):
Enter same passphrase again:
Your identification has been saved in /home/youruser/.ssh/id_rsa
Your public key has been saved in /home/youruser/.ssh/id_rsa.pub
The key fingerprint is:
SHA256:qn8d2fzLmONzHwVPEU0QyZj9Exie9jOzJ2MAcFuEWSU youruser@host
The key's randomart image is:
+---[RSA 3072]----+
|        . .=EB*B+|
|         ooo+o=.o|
|          o  +..o|
|           .. .=.|
|        S  +.  =+|
|       .  o o.  *|
|      .  . . .+o.|
|     .  . . o=ooo|
|    ....   .++oo.|
+----[SHA256]-----+
This will generate two files for you: id_rsa and id_rsa.pub. id_rsa is your private key—don't share that with anyone! id_rsa.pub is your public key, and that's the opposite—it's meant to be shared. What we need to do now is copy that public key to the Steam Deck in a special folder and set its file permissions correctly. Thankfully, we don't have to do any of that manually because OpenSSH ships with another neat tool, aptly called ssh-copy-id.
Its usage is very simple; you just point it to the public key (by default it will try to copy all public keys, so I just like to be explicit) and the target device:
ssh-copy-id -i ~/.ssh/id_rsa.pub deck@192.168.1.169Remember to replace the IP address with the one for your own Steak Deck. Also, on Windows, the path to your public key probably looks something more like C:\Users\youruser\.ssh\id_rsa.pub.
It will give you some information and prompt you with the password. On success, the output should look something like this:
/usr/bin/ssh-copy-id: INFO: Source of key(s) to be installed: "/home/youruser/.ssh/id_rsa.pub"
/usr/bin/ssh-copy-id: INFO: attempting to log in with the new key(s), to filter out any that are already installed
/usr/bin/ssh-copy-id: INFO: 1 key(s) remain to be installed -- if you are prompted now it is to install the new keys
deck@192.168.1.169's password:

Number of key(s) added: 1

Now try logging into the machine, with:   "ssh -o 'PubkeyAuthentication=no' 'deck@192.168.1.169'"
and check to make sure that only the key(s) you wanted were added.
Now, the last past, before we can finally jump into Godot and configure our remote deployment. We will configure OpenSSH to use our private key for connecting, so it doesn't ask us (or Godot, for that matter) for a password.
We have to create a file called config in the .ssh directory, so that means that its full path will be something like C:\Users\youruser\.ssh\config on Windows, /Users/youruser/.ssh/config on MacOS, or /home/youruser/.ssh/config on Linux. So, open it up in your favorite text editor, which better be Neovim, and add the following:
Host 192.168.1.169
    HostName 192.168.1.169
    User deck
    PreferredAuthentications publickey
    IdentitiesOnly=yes
    IdentityFile ~/.ssh/id_rsa
To explain:
- Host - the name which will be used to connect. If you set it to "foo", then you could connect using "deck@foo". But, for familiarity's sake, we'll keep it to the Deck's IP address (remember to replace it with your own).
- Hostname - the actual address of the Steam Deck.
- User - the user name we will use.
- PreferredAuthentications - set the method of authentication. Since we want to use our key, we set it to
publickey. - IdentitiesOnly - we indicate that we want to only use the identity file listed in the configuration for authentication, otherwise, if we have multiple private keys, OpenSSH will try them all, and that might cause the server to kick us off.
- IdentityFile - the identity file (private key) used for the authentication.
Save the config file and close it. Now you should be able to SSH into your Steam Deck by just using its IP address and without having to supply a password. Feel free to try it:
ssh 192.168.1.169If you did everything correctly, the familiar Steam Deck shell prompt should appear.
Lastly, there's an important command you need to run from the Steam Deck itself (not from the SSH session you just opened). It will give the deck user access to the display server of the Steam Deck, which is important for Godot to be able to launch the remotely deployed game:
sudo xhost +si:localuser:$USERIf you restart your Steam Deck, you need to run it again. Make sure to remember that! Now you can exit the SSH session by typing logout. We are ready to configure Godot for remote deployment!
Configuring Godot
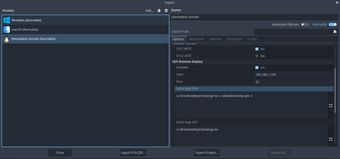
Cool. We are almost done! Now we go back to more familiar territory. Launch your Godot project and go to Project → Export. Create a new export profile for Linux. You can leave everything as default except the most important part—the "SSH Remote Deploy" section. Set "Enabled" to "On". That will open up a whole bunch of extra options, but we only need to set a couple.
- Host - set it to the Deck's IP address.
- Port - set that to
22. That's the default for the SSH server. - Extra Args SSH -
-o StrictHostKeyChecking=no -t - Extra Args SCP -
-o StrictHostKeyChecking=no
The "extra args" are just some options for the SSH client. StrictHostKeyChecking=no won't check if we have connected to the remote machine before. It's our Steam Deck on our own local network, so we trust it. Leave the rest as default. We are almost done. For real now.

So we're able to use the debugger, jump through breakpoints, and all that good stuff; we need to enable "Deploy with Remote Debug". You can do that in the "Deploy" menu:

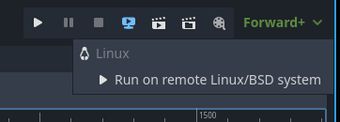
Now we are ready to see the magic happen. A button that was disabled before, the Remote Debug button, next to the "Stop Running Project" button has become available. When you click it, a dropdown appears, allowing you to run your game remotely on your Steam Deck:

Godot will run through the usual export process, but now it'll additionally run an extra step—an upload of your game to the Steam Deck. And as soon as that upload is done, your Steam Deck will launch the game, while you can still see the Output section updating in your Godot Engine window. You can also set breakpoints and everything just as if you'd be running the game from your own computer!
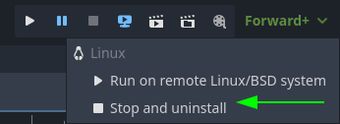
There's one final note: instead of exiting the game through your Steam Deck, use the "Stop and Uninstall" button in the "Remote Debug" dropdown; otherwise, Godot won't clean up after itself, and your Steam Deck will fill up with the data Godot uploads to it:

Also, as I mentioned before, remember to stop the SSH server with sudo systemctl stop sshd when you are done with your debugging session! The SSH server doesn't take up any resources, but there's also no real reason to keep it running. Just remember to start it next time again when you are about to go on a bug hunt.
Conclusion
This should hopefully save you some time in the long run in case you want to do some Steam Deck-specific development without having to develop on the Deck itself or having to upload the builds manually every time. If your game is larger in size, there is a "Small Deploy with Network Filesystem" option meant for deploying larger exports in the "Debug" dropdown, but I haven't looked into it. Maybe you can do us both a favor and check it out!
Meanwhile, I go for a more ghetto approach, where I limit the amount of exported files via the "Resources" tab in the export dialog, so I push only the files that I need to work with and their dependencies.
Thank you very much for reading! If you run into any issues, or if you have comments, ping me on bsky or mastodon!